


Whether you grab them for a specific recipe or pick up a couple so you can have fresh herbs on your windowsill, those little potted herbs at the grocery store are awfully nice to have around.
Of course, the hard part is keeping them around once you get them home. They have a habit of dying. Fast.
But with a little effort, you can have fresh herbs for years to come.
Let’s look at why supermarket herbs die so quickly, which ones are worth keeping alive, and what to do to turn them into thriving plants that last. I’ve also packed this piece full of general information and handy tips for growing herbs indoors.

It Looked So Good in The Store, What Happened?
It seems we all have the best intentions when we bring home those lovely little potted herbs. We’ll keep them on our windowsill, we tell ourselves. After all, how hard can it be? The shiny plastic sleeve they come in says just water them and keep them on a sunny windowsill! I can do that.
Then, a week later, your little potted herb is dead.
What happened?
Nothing; it did exactly what it was supposed to do.
Despite the “care” instructions on the packaging, these herbs are meant to last long enough to make it to the market, be bought by a consumer, perish shortly after, and have you buy them again the next time you’re roasting a chicken.
A Closer Look at Growing Conditions

Supermarket herbs are grown in commercial greenhouses, in tiny pots, cramped together by the hundreds, if not thousands. Because they are packed together, they spring up tall and leggy, each one trying to out-compete its too-close neighbor.
Because of their small pot size, they’re watered almost daily to prevent them from drying out. The immature plants are shipped with first-growth leaves (Which is not necessarily a good thing, but we’ll cover that later), and they’re rootbound by the time they reach you.
Once at the store, these little buggers sell so fast that they rarely have time to start to decline, but if they start to look poorly, they are pitched rather than sold.
None of this is a bad thing if you’re buying them to have the freshest herbs possible for cooking. It only becomes a problem if you actually want to keep them.
It’s no wonder we’ve all killed our fair share of supermarket herbs. They were never going to make it beyond that lovely roast you made, at least not without some help.
When To Grow and When To Say No


There are quite a few live herbs on offer at the supermarket these days. You’ll likely find the following sold at the supermarket:
- Basil
- Chives
- Cilantro
- Dill
- Mint
- Parsley
- Rosemary
- Thyme
- Sage
However, not all of them are good candidates for long-term tenants on your countertop.
Out of those nine, luckily, only two are herbs that you won’t be able to keep around for long. Dill and cilantro – both have relatively short lifespans and will eventually go to seed, even under ideal conditions. So, buy them, water them, enjoy them while they last, then compost them and don’t feel bad when they kick the bucket.
Basil can be transplanted and will do well for a while, but the plant will naturally grow more woody over time. Within a year or so, you’ll want to start over with a fresh plant. It’s still worth a little effort up front, though.
The other six herbs can all be transplanted and last anywhere from a couple of years (parsley) or as long as you are willing to keep up with them.
Hydroponic Herbs
Hydroponically grown live herbs used to be pretty popular. The potted herbs in soil have become more popular (and I suspect cheaper to grow). The hydroponic herbs are almost impossible to convert to growing in soil, and it’s rarely worth the time and energy spent doing so.

Now that you know which supermarket herbs are worth the time, here is what you need to do to take them from disposable to dependable.
Prune It Hard
Let’s start with the first and most important step – prune those suckers hard!
Except for chives.
Yes, right off the bat, there’s a caveat. Chives are what we call a “cut and come again” plant. These guys don’t need to be pruned when you bring them home. They are fine as is; however, the more you snip and use them, the more new growth they will produce. While you don’t want to hack them all off at the base, you do want to use them regularly to stimulate new growth so they grow fuller. Cut chives an inch up from the crown of the plant.
You’ll notice how floppy your herbs are when you take them out of their protective sleeve.
That’s because of those growing conditions we mentioned. Without extra space and good airflow, the herbs stretch to reach the sun and develop thin, flimsy stems as they all compete for nutrients and sunlight.

You’ll also notice the leaves are pale green and rounded at the tips, unlike the cut bundles of herbs you can buy. That’s because these are seedlings, and this is all first growth, which has much less flavor than mature growth.
To fix this, we need to cut them off at the knees, so to speak.
By cutting them hard and low, you’re getting rid of that weak, leggy growth. This creates a foundation for the plant to grow stronger, and it encourages a ton of new bushy (more flavorful) growth, which is what we want. We want short and wide, not tall and skinny.
How you prune herbs depends on where new growth appears on the plant. Once you know this rule of thumb, you’ll know how to prune any herb you come across.
Growth From the Crown
For instance, both chives, dill, parsley and cilantro are cut and come again. (Don’t forget that dill has a limited lifespan, though.) You will notice that the stems are long and slender with no joints (leaf nodes) along them. For parsley and cilantro, the leaves appear at the very top of the stem.
These types of herbs should be cut as close to the ground as possible, even if, like with parsley and cilantro, you’re only using the leaves on top. This will stimulate new growth in these types of plants, which will emerge from the crown.

We’ve already discussed chives; for parsley and cilantro, you’ll want to cut everything off about an inch to two inches at the base. Yup, just cut it all off. (Now go make soup and tacos.)
Growth at the Nodes
The rest of the plants on our supermarket herb list: basil, mint, rosemary, thyme, and sage, all grow from leaf nodes along the sides and top of the stem. Wherever there is a joint along the stem, new leaves will grow on either side; meanwhile, the center stem will continue to grow taller, putting out new nodes along that growth.
For these herbs we want to pinch off that center lead and trim back any long stems growing from other side nodes.
This will stop the plant from growing taller and encourage stronger side and base growth. In the end, this leads to a bushier plant with more leaves.

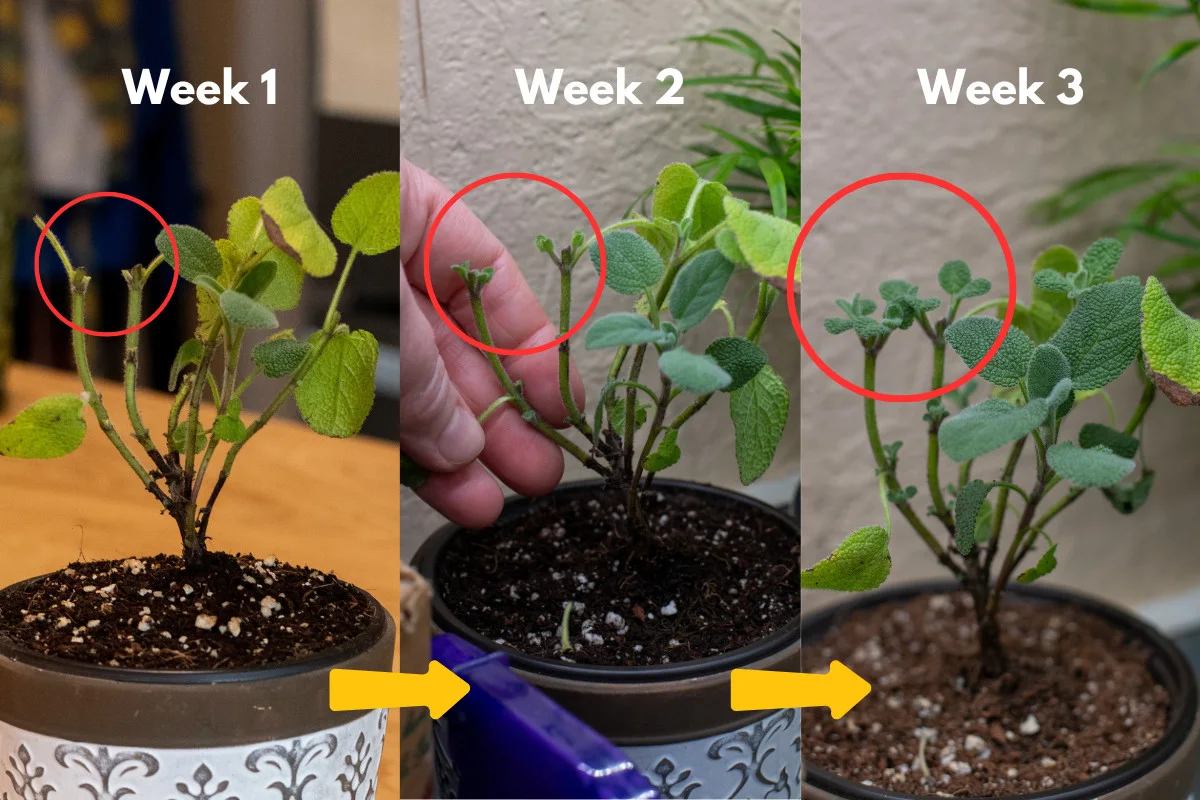
Cut just past a leaf node; any remaining stem will die back to the first node. For supermarket herbs, I highly recommend cutting at the second leaf node up from the base. You want to cut them back hard and get rid of as much of that flimsy growth as possible. Again, this encourages a ton of new growth on the plant, as you can see by the mint plant below (only seven days post-haircut).
Long-term tip: This initial hard pruning is only done once to retrain how the plant grows. Once it’s had a chance to grow in a little, regular snipping and using of your herbs will keep new growth coming and prevent the plants from growing too leggy.
Repot the Plant
In reality, what you’re buying is a seedling. By the time it reaches you, these herbs are rootbound and in desperate need of potting up. There is a direct correlation between soil and root ratio and how often your herbs will need to be watered.
If the plant is rootbound, there are too many roots and not enough soil to hold water and nutrients. The plant dries out faster, has a harder time taking up nutrients, and is more likely to die.
If you plant up too large, there is too much soil and not enough roots. The soil will hold more moisture than the plant can absorb in a timely manner, and the roots will rot, making the plant more likely to die.
You want that Goldilocks sweet spot.
Hint: This ratio of soil to roots applies to (nearly) all plants. Blooming houseplants such as Christmas cactus and African violets prefer to be a bit cramped in their pots to encourage blooms.
For supermarket herbs I recommend only going up one or two inches in pot size, so either a 4” or 5” pot. Make sure your pot has a drainage hole, and consider using a pebble saucer beneath it. These are also great-sized pots for plants you plan on growing on a windowsill or countertop.
Choose a potting soil that’s lightweight and quick-draining. You might want to mix in some worm castings or mycorrhizae to give your herbs a little nutrient boost.
Carefully remove the herb from its nursery pot. Gently shake and massage the root ball to open it up a little. If the plant is severely rootbound, trim some of the root ball away so it’s more manageable and does not encircle itself.
Repot the herb into a new pot. Adding some mycorrhizae to the roots before you cover them up will ensure a healthy, thriving plant in the long run. (This is the stuff I use.) Lightly press the soil into place and water the plant well.
Let Your Plant Bounce Back & Enjoy

You’ve done everything needed to ensure your single-use potted herb will be around for many culinary adventures. Place your herb where it will receive plenty of bright, indirect light. Continue to water it whenever the top inch of soil is dry. Feed your herb with a balanced houseplant fertilizer according to the package instructions.
A little extra humidity will do your herbs some good while they’re acclimating to their new pot and haircut. Cover the pot with a clear plastic bag for a few days, just until you notice some new growth either at the crown or the leaf nodes. (Save the plastic sleeve they come in and use it!)
Here are a few final tips and tricks:

Once your plant starts to show new growth, you know it’s bouncing back. Water when the top inch of soil is dry. Because you’re using a small pot, they will tend to dry out quicker, so check your pots frequently.
For truly exceptional herbs grown right on your countertop, consider adding a hidden greenhouse to your kitchen. (You can read more on how to do that here.) You’ll be able to grow much more than just herbs.
I know I’ve thrown a lot of information at you. But now you know not only how to keep supermarket herbs alive but also how to grow and prune herbs in general. Look at you, you herb-growing expert, you!

Get the famous Rural Sprout newsletter delivered to your inbox.
Join the 50,000+ gardeners who get timely gardening tutorials, tips and tasks delivered direct to their inbox.